Liza

Nov 052011
 

How to Save Money Buying Chicken In Bulk
How to Save Money on Proteins Buying in Bulk

I’m pretty sure that we all have noticed the increase in prices as the grocery store over the last few months.  One area I’ve noticed a huge difference in is fresh proteins.  In the past I could sometimes find boneless, skinless chicken on sale for under $2/lb; now it is regularly $3.30/lb and sales are few and far between.  While there are coupons for many products those coupons rarely include fresh meat, so you might be wondering how to save money in this area.

One way to save is when you buy in bulk.  Normally I make my bulk purchases at warehouse stores.  But I recently discovered a new option: Zaycon Foods where I can buy fresh boneless, skinless chicken breasts for under $1.50/lb!

Zaycon Foods was founded in 2009 and is based in Washington state.  The goal of their company is to bring fresh meats and other products direct to consumers at wholesale prices.  They combine the buying power of multiple families in each community which allows them to negotiate huge savings.  Then they look for farms or processors in each community and bring you the foods directly from them; your meats are as fresh as if you owned a farm yourself (without all the mess and work!).  And they sell the meat by the case; this allows them to further keep the costs down by skipping handling charges.

I had the opportunity to participate in a Zaycon Foods event this week and I honestly, I wish all my shopping was that easy.  A couple of weeks before they came to town I went online to reserve my case.  (Chicken cases each contain 40 lbs. of chicken.)  I choose the event closest to me (they generally have multiple events in each state), ordered my case of chicken – each case of chicken costs $60-65 – and printed out my confirmation.  Then this week on my assigned day and time I drove to the delivery location and waited.  The driver was a few minutes late, but once he did arrive, I was in and out in less than 2 minutes.  I didn’t even have to get out of my car!  Just drove up next to the truck, told the guy where I wanted my chicken stowed, told him my name and off we drove.

The chicken is fresh and comes packaged in a big box (designed for refrigeration).  When I got it home and we opened the box, there were four plastic bags of about 10 lbs. each, and they were all sealed inside a larger plastic bag.  The breasts were huge with very little fat on them.  We portioned them out to roughly two double-breasts to each gallon-sized ziptop plastic bag. That way we can pull out only what we need for each meal.

What to do with all that chicken?  Well, to start check out this recipe I prepared using my Zaycon chicken.  You can also check out my Pinterest recipe boards for additional ideas.  And be sure to like them on Facebook and follow them on Twitter as in addition to updates about deliveries in your area and new additions to their offerings I have also found that they share recipes.

Giveaway is now closed.

I received the above stated product(s) in order to facilitate my review. No other compensation was received and all opinions are 100% that of myself and my family.
Nov 052011
 

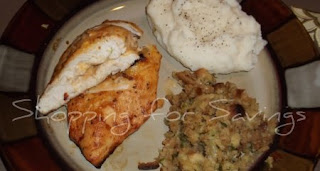
I skipped over Tasty Tuesday this week so that I could bring you a recipe using the fresh Zaycon Foods chicken that we picked up this week.

Chicken is one of those things that while really versatile, I often find myself making it in the same four or five ways every time: Buffalo Chicken Mac & Cheese, Chicken Chimichangas, fried chicken, homemade chicken nuggets or baked chicken with Lawry’s.  So I decided to change things up and play around a little bit with the chicken I made for dinner last night.  I used only what I had already stocked in the pantry and while it’s not going to win any Iron Chef competitions, Cheesy Stuffed Chicken is something I’ll make again sometime!

Pantry Chicken Recipes Continue reading »

Nov 032011
 

Piggy Wiggies are collectible plush toys that are made from socks.  The company was launched earlier this year at the New York Toy Fair and has already had the distinction of having their product named Plush Toy of the Year by Creative Child.

Piggy Wiggies are named after members of the creator’s family.  Bingy and Lilly are sister Piggy Wiggies (named after the creator, Emma Louise, and her own sister).  Other family members are also represented such as Doodles (the Dad).  There are even limited edition holiday ones: Loved Santa and Santa Snorz (great stocking stuffers!).

These toys are recommended for ages 3 and up, and because of the buttons used for nostrils, I definitely agree with that recommendation.  However, Baby C. saw them and instantly fell in love.  At first she was only allowed to play with them while sitting on either my or hubby’s lap so we could monitor her play and ensure she wasn’t putting the buttons in her mouth.  She loved them so much, though, that she never wanted to set them down.  So we ended up cutting off the buttons.  Poor Piggy Wiggies!  It was the only way we were comfortable with letting her play with them, though, and it’s good that we did.  She’s grown so attached that she literally cries if I take one out of her hand long enough to just put her arm through her stroller strap.

Joining the Piggy Wiggies family are Howly Owlies.  The first one, Sad Sam, is available now; the rest should be available starting in December.


Like them on Facebook and follow them on Twitter to keep up with updates and other news.

Where to Buy
Piggy Wiggies start at $13 ($6.99 for key chains) and are carried at FAO Schwarz, various boutiques and zoos around the country, and online.
You can also win your choice of one large Piggy Wiggy and one key chain!  Just fill out the Rafflecopter form below.  Reminder: Rafflecopter takes a moment to load; if you don’t see the form after a minute, please try refreshing your browser.

Enter Here:

Nov 012011
 
If you are my brother or my sister-in-law – stop reading here, please!

I wanted to make something a little special as an “Our First Christmas” ornament for my brother and sis-in-law this year and when I saw a similar ornament on Pinterest a few weeks ago I thought it would be perfect.

DIY First Christmas Wedding Ornament

A clear glass ornament (I purchased mine at a craft store)
Wedding Invitation
Craft knife or pair of scissors
Ribbon (coordinating with the colors of the invitation)
Charm (I used a heart that I found in the jewelry section of a craft store)
Pen or pencil

I started by cutting the invitation horizontally into strips; I didn’t use the entire invitation, but I cut out the sections that had all the important information such as their names, date, location, etc.  I used a pair of scissors so they’re not perfectly straight or of even thickness, but I can’t find the box I had all my crafting supplies packed into, so I couldn’t get out my mat and knife.  It worked just fine, though, I think.

DIY Our 1st Christmas Ornament

Next I wrapped the strips of invitation around a pen to corkscrew them.

DIY Our 1st Christmas Ornament

After I curled them I slipped them all into the glass ornament.

DIY Our 1st Christmas Ornament


I used a heart-shaped charm on my ornament but you could easily swap it out for something special to the bride and groom (a sun for an outdoor wedding, a starfish for a beach one, etc.) or something Christmas-y, like a snowflake.


DIY Our 1st Christmas Ornament

I tied a ribbon on; as you can see the pink of the ribbon is a lot brighter than the actual invitation, but watermelon was one of their wedding colors so I thought they would like it.  (It’s a quick fix to untie it and throw a new one on if they don’t).  You’re also pretty safe if you choose to go with white/cream.

Do you have a craft you’d like to share with everyone?  Feel free to link it up below!
Oct 312011
 

Happy Halloween!  I hope everyone that is participating in any kind of activity tonight has a fun and safe evening.

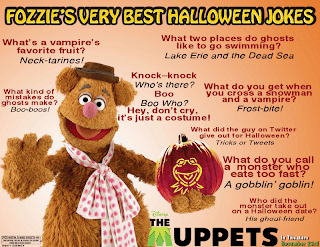
If you’re looking for some jokes to tell in the car – or if you want to tell a few as your walking from house to house trick or treating – check out these jokes from Fozzie.  (Yes, we went trick or treating in the car when I was growing up.  Our nearest “neighbor” was about a quarter-mile away, and it just spread out from there.)  Click the image for a larger, printable version.

Muppet Pumpkin Stencil & Jokes for Halloween

And if you still need to do some pumpkin carving, try this Kermit stencil.  The design looks like it would be pretty quick to complete.  If you print it out now (click the image for a printable version that includes instructions) you could be done in less than an hour I would suspect! Continue reading »